General
Image sources generate the input image data for image processing in ToolGroup-Items. Viper.NET image sources include not only the configuration of the data source, for example a camera, but also the accompanying processes of image acquisition. For example:
Control communication before and after image acquisition
Image sources thus represent a parameter set for an image acquisition. Multiple sources can use the same physical hardware. For example, several image sources can use a camera with different exposure times. To prevent parameter sets of a camera from being changed by simultaneous access during image acquisition, a synchronization of image sources is performed. With reference-image-sources the same parameter set (or image source) can be used multiple times within a project.
All image sources have a name for identification by the user. Referencing within the project is done using a numeric ID. The ID must only be assigned for sources that are referenced. It must then be >0 and unique within the BV project. An ID -1 means that no ID has been assigned. The image source organization is done in image source lists. In addition, image sources have a synchronization key which is usually generated automatically on a hardware-specific basis and ensures that the same hardware is not parameterized simultaneously by multiple image sources.
Image feed
Image sources repeat the internal image acquisition process when errors occur until the maximum number of attempts Acquisition retry has been reached. Only then, if applicable, will the error from the last attempt be propagated out. Before each retry, the process pauses for the set duration Sleep between retry.
To start image acquisition, the system waits for exclusive image source access by means of a lock. If the waiting time exceeds the set TimeoutEnterSync, an image acquisition error is generated. After locking the image source, the image acquisition pauses again until exclusive access to the light channels of the associated light-situation is ensured by means of a lock. If the wait time exceeds the set TimeoutLockLight, an image capture error is generated. If the image source is not associated with any light situation, the step is skipped. After locking the source and light situation, image acquisition is performed from the corresponding source.
If the image source has a manipulation-toolgroup this will then be executed with the raw image. The output image of the manipulation-toolgroup> is then provided as the final image of the source. Without the *toolgroup, the output image is the same as the raw image.
Image Source Lists
The Image Source Organization is done on different hierarchy levels in image source lists.
Each line of the list shows an image source. Image sources that are in simulation mode are displayed with a yellow background. Faulty image sources, for example if the connection to the camera could not be established, are highlighted in red. Double-clicking on a line opens the Settings of the image source.
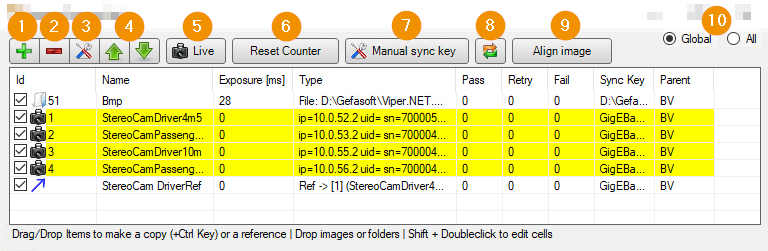
The columns show the following information:
Id: Displays an Active checkbox, an icon illustrating the type of image source, and the numeric ID (identification number) if one has been assigned. Marking an image source as inactive/active determines whether jobs trigger image acquisition as part of upstream image acquisition. The images of inactive sources are set to
nullbefore execution.Name: User-defined name to identify the image source.
Exposure: Shows the exposure time of the sensor (if available).
Type: Describes the type of the image source and shows essential configuration data depending on the type.
Pass: Number of successful image acquisitions.
Retry: Number of image acquisitions that were repeated due to an error.
Fail: Number of failed image acquisitions. Only counted up if the Retry also fails.
Sync Key: Key name to ensure synchronization of accesses to the image source. See Synchronization of image sources.
Parent: Describes The image source list in which the source is defined. The description is given as a compound string in the form
Type-DisplayName->*JobName*->*ToolgroupItemName*. Here the DisplayName of the BV type, in the screenshot BV, describes the global level. Job and ToolgroupItem names are omitted accordingly if the list is defined at a higher level: for example, for global sources as in the screenshot.
Hint
The order of the sources in the list of a ToolGroup Item is crucial for the allocation of stored input images in the RunFromDir.
Hint
If a ToolgroupItem does not acquire the image via the imageacquisition of job but via GImgSrcItfTool for example, the source should be marked as inactive to avoid unnecessary image acquisition.
Editing the list is done in the toolbar or via context-menu:
Add: Adds a new image source to the list.
Remove: Removes the selected image source.
Settings: Opens the settings of the selected image source. The dialog can alternatively be opened by double-clicking on an image source.
Up/Down: Moves the selected image source up/down in the list.
Live: Opens a live-display for the selected image source.
Reset Counter: Resets the image acquisition counters of all image sources to 0 (columns Pass, Retry, Fail).
Manual sync key: Opens a dialog to manually enter a sync key of the selected image source.
Refresh: Refreshes the list display
Align image: Opens a dialog to align camera using a reference image. For example, this restores the original camera alignment after maintenance.
Global/All: Selection whether all or only global image sources are shown in the list. The selection is only available in the global imagesources list.
Tips for power users
Shift+double click: The parameters ID, Name and Exposure can be edited directly in the list.Drap&Drop image files: Image files can be dragged from Explorer directly onto the list. A File-based image source is then created for each image file.Drag&Drop from other image source list: Creates a reference image source for each selected image source with an ID in the destination list.Ctrl+Drag&Drop from other image source: Creates a copy of each selected image source in the destination list.
The context menu offers additional editing options compared to the toolbar:
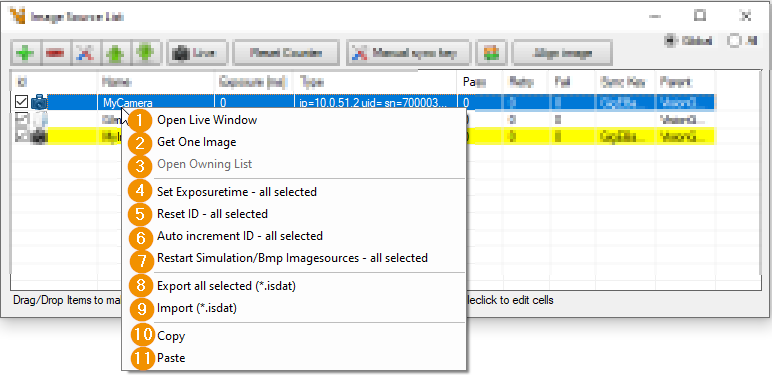
Open Live Window: Opens a Live-Display with active continuous image acquisition.
Get One Image: Pulls in a single camera image and opens a live-display for display.
Open Owning List: Opens the image source list that contains the selected source. This is relevant if all sources are displayed in the global list. The option is deactivated if necessary.
Set Exposuretime - all selected: Sets the same new exposure time for all selected image sources.
Reset ID - all selected: Resets the image source IDs of all selected sources to
-1.Auto increment ID - all selected: Assigns new IDs to the selected image sources. The IDs are incremented sequentially from a starting number of
Restart Simulation/BmpImagesources - all selected:
Export all selected (*isdat): Exports all selected image sources to an isdat file. The storage location is freely selectable.
Import (.*isdat): Loads image sources from an isdat file and adds them to the image source list.
Copy: Copies the selected sources.
Paste: Pastes previously copied image sources into the list.
Image Source Editor
The settings dialog of each image source is divided into two sections:
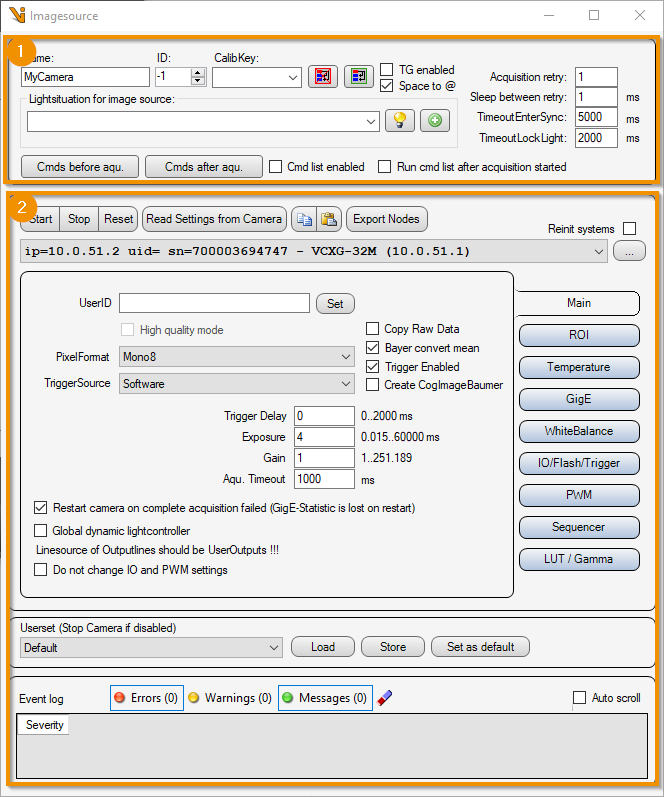
General image source settings
Special settings depending on the type of image source. The Standard image sources explain the meaning of the essential parameters. Detailed info can usually also be found in the manufacturer documentation of the hardware or the SDK.
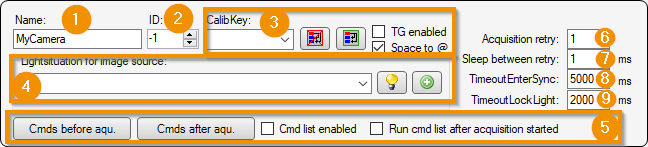
The general settings include:
Name: Freely selectable name of the image source
ID: ID of the image source in the system: The assigned ID must be globally unique. If no ID is required, the default value -1 can be used. IDs are necessary for the definition of image source references, for example.
Settings for manipulation-toolgroup and calibration key: The output image of the image source can be modified by a toolgroup.
Setting a light-situation to be active during image acquisition.
Setting command-lists: Before and after image acquisition, commands can be executed, for example to control liquid lenses or zoom lenses.
Acquisition retry: Specifies the maximum number of times the image acquisition should be repeated in case of an error, cf image-acquisition.
Sleep between retry: Wait time before retrying an image acquisition in case of error, cf. image-acquisition-of-job.
TimeoutEnterSync: Maximum waiting time of the image source until successful lock of the source: If the waiting time is exceeded, the image-acquisition is aborted with an error.
TimeoutLockLight: Maximum waiting time before the light channels of the light situation are locked. If the waiting time is exceeded, the image-acquisition is aborted with an error.
Light situation of the image source
An individual light situation can be set for each image source or a globally predefined light situation can be assigned. This light situation is activated during image acquisition.
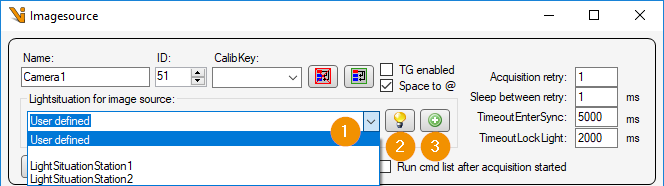
Select lighting situation: The choices are predefined Lumos lighting situations and the User-defined option. User-defined lighting situations are only defined locally for this one image source and are not available via the lighting control.
Enable light situation: Activates or deactivates the light situation.
List of predefined lighting situations: Open a dialog for editing selected lighting situations.
It is usually recommended to set the lighting situations in each image source locally user-defined: the image source then includes all parameters for a particular image acquisition. Reusability is then possible in the form of reference-image-sources. The definition of global light situations is only useful if several different image sources require the same light situation.
Hint
If a light situation is assigned to an image source, the superordinate toolgroup item must not receive a light situation.
Live display
For each image source, a live display can be opened via the image-source-lists. The display shows camera images of the respective image source, especially for Camera setup and error diagnostics. In live mode, images are continuously reacquired from the source and displayed.
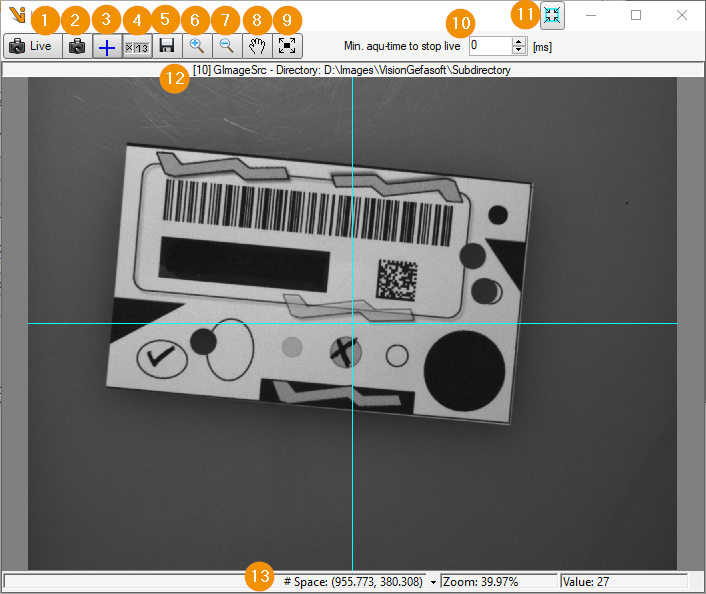
Toggle live mode: Enables/disables live mode with continuous feed of camera images.
Get one image: Pulls in and displays a single camera image.
Toggle crosshair: Fades in/out a crosshair
Toogle statusbar: Enables/disables the display of the status bar below the image.
Save image: Saves the camera image to a selectable file.
Zoom in: increases the zoom level of the display
Zoom out: reduces the zoom level of the display
Toggle Pan-mode: Enables/disables the Pan mode of the cursor. In Pan mode, the image section can be shifted.
Fit image:Passt die Zoomstufe so an, dass das Bild vollständig in der Ansicht sichtbar ist.
Min aqu-time to stop live: Waiting time for image acquisition in live mode. If the image acquisition takes longer, the live mode is terminated.
Align Live Displays: If multiple Live Displays are open, this button will arrange them all visibly next to each other and bring them to the foreground.
Description: describes the image source of the display: image source ID, image source name and optionally short information about the source are displayed.
Status Bar: Shows the current cursor coordinates in the selected coordinate space, the current zoom level and the gray value of the image at the cursor position.
Synchronization of image sources
A camera can be used by several image sources with different settings. During image acquisition, however, the camera may only be controlled by one image source. Therefore, internally in Viper.NET, access to the physical camera is automatically blocked via the synchronization key of the camera. If the image source cannot lock a key within a configurable waiting time because it is already locked by another source, an image acquisition error is generated.
Each image source generates an automatic unique sync key for the underlying interface, e.g. via manufacturer name and camera serial number. The sync key is displayed in the Image Source Lists. It can be overwritten by a manually defined key if required.
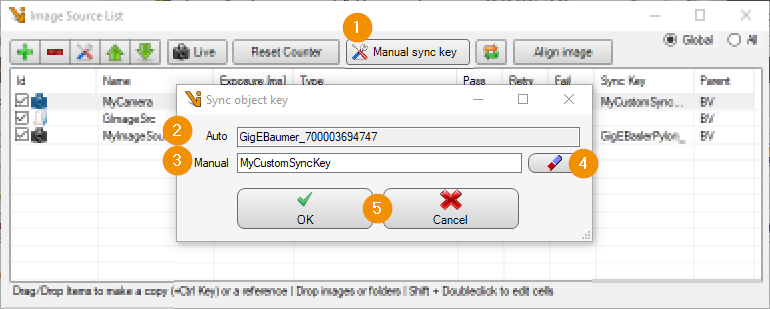
Manual sync key: Opens the dialog for sync key assignment of an image source
Auto: Display of the automatically generated synchronization key
Manual: Editing the manual synchronization key
Erase: Removes the manual synchronization key
OK/Cancel: Closes the dialog and accepts or discards changes.
Hint
Manual synchronization keys can be used when multiple cameras share a common resource for data transmission and thus delay or block each other’s communication, e.g. when multiple cameras are connected to a single USB HUB or multiple GigE cameras need to be connected via a switch.
Warning
The definition of a manual synchronization key overwrites the automatic key. The user must then ensure that the same synchronization key is set in all image sources that use the same physical camera. It is therefore recommended to define a synchronization key only in global image sources and to use such sources in toolgroups in the form of reference image sources: the referenced synchronization keys will then always be used.