PLC type data
PLC Type Data provides an interface between Viper.NET and a PLC to manage type data, i.e. type-dependent production data records of the PLC in Viper.NET.
The PLC can be started with the commands ‘Load’, ‘Save’, ‘Next’ and ‘Previous’ in connection with a type name:
Request production data records of a type with ‘Load’ and read from the data block.
Save changes from current types in Viper.NET by updating data in the common data block and executing ‘Save’.
Retrieves the next type with ‘Next’ and reads from the data block.
Retrieves the previous type with ‘Previous’ and reads it from the data block.
Warning
Simultaneous configuration of type data via the PLC and the Viper.NET GUI may lead to inconsistent data when saving. Background: The changes of data sets (data block) can be done by the PLC as well as in Viper.NET.
Type data management using PLC
The type data station uses the standard handshake, see also :Station handshake. Valid values for the command ‘In_Cmd’ are Load (1), Save (2), Next (3) and Previous (4). The type name ‘InTypeName’ must be specified for the respective command. On successful execution, the command ‘InCmd’ is mirrored to ‘OutCmd’ and the current TypeName is written to ‘OutTypeName’. OutStateInfo additionally transmits the PC status to the PLC (error case).
InCmd.IN<MyTypeData>Cmd |
[UINT16] |
Command from the PLC 1:Load; 2:Save ;3:Next;4:Previous |
InCmd.IN<MyTypeData>TypeName |
[string(30)] |
For Load and Save: PLC sets the type to which the command is to refer. |
TypeData<MyTypeData> |
[Data Block] |
With ‘Save’ PLC writes type data. |
The :station handshake triggers the command.
TypeData<MyTypeData> |
[Data Block] |
At ‘Load’, ‘Next’, ‘Previous’ Viper.NET writes the type data. |
OutCmd.OUT<MyTypeData>Cmd |
[UINT16] |
Command echo. Viper.NET confirms the successful execution. |
OutCmd.OUT<MyTypeData>typeName |
[string(30)] |
Viper.NET sets the current type data names. |
OutCmd.OUT<MyTypeData>StatusInfo |
[string(80)] |
Status & error messages from Viper.NET to the PLC. |
TypeData<MyTypeData> |
[Data Block] |
Contains the current type data. |
Type data management in Viper.NET
The type data management in Viper.NET is accessible via the sidebar (here “PLC-Params”). In the following figure, for example, two type data are configured.
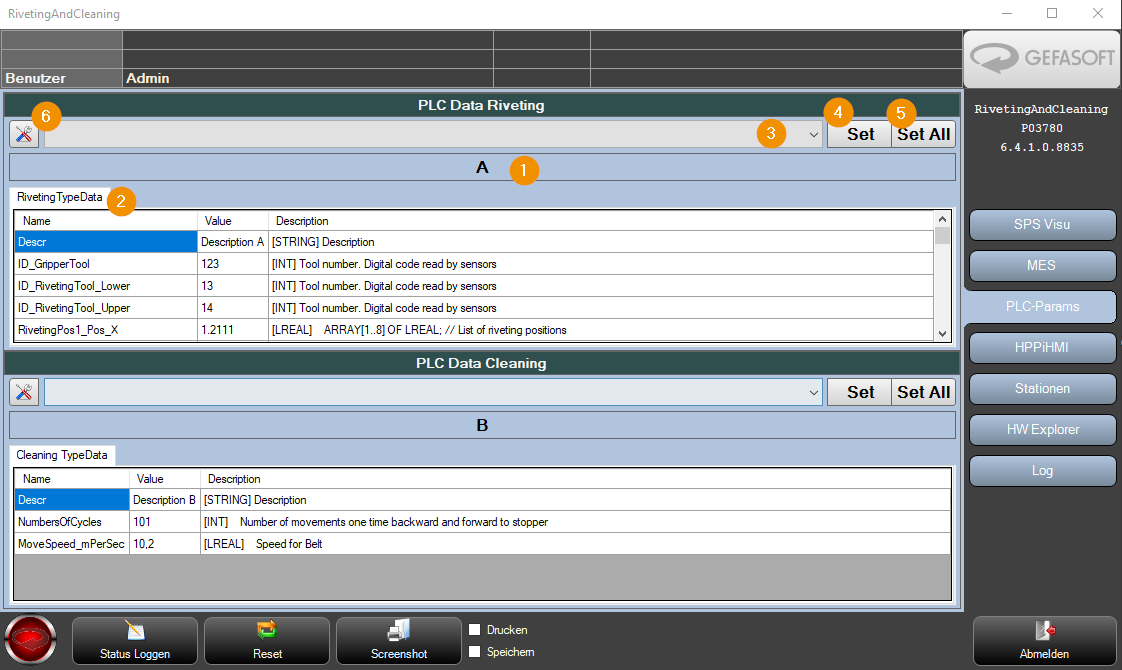
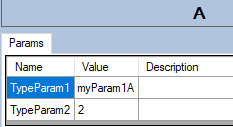
Current type name
Current type data (display)
Preselection Current type
Set sets the selected type (3) to active. The parameters for the selected type are written to the controller.
Set All Sets the selected type (3) to active for all type data managers. The parameters for the selected type are written to the controller(s). This button is only visible in Multi mode.
Opens the dialog for setting the type data parameters or the type data configuration.
Type name (selection)
Create new type.
Delete the selected type
Rename the selected type
Saves the type data of the selected type on the file system. If an archive folder is configured, the type file is additionally archived.
Values Input column.
Edit column. With unsigned integer format, values can be entered in Hex UInt32 (0x000000) or Hex UInt16 (0x0000).
Last modification date of the type data.
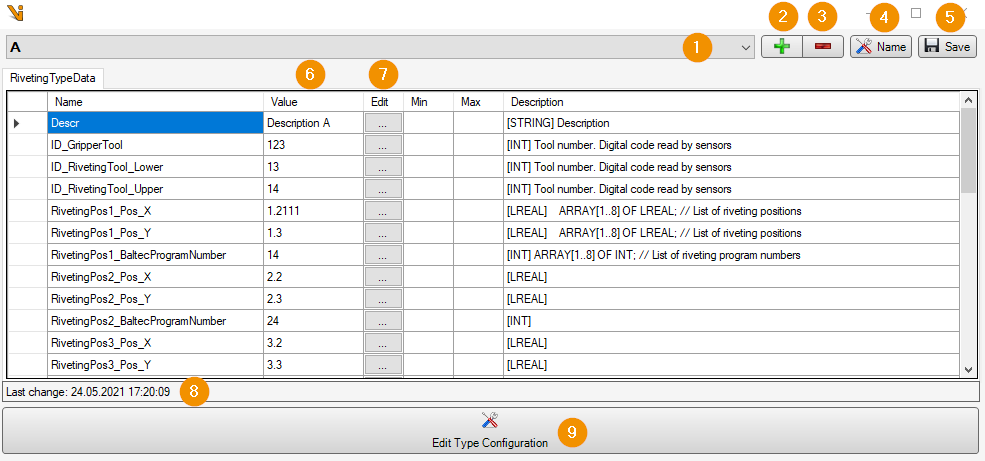
Edit the type data configuration.
Read only: Pure display mode for the PLC type data. The data cannot be edited on the PC.

Type directory Specifies the directory relative to the Viper.NET data directory where type data is persistently stored.
Remember last type When Viper.NET is restarted, the last type data is loaded, otherwise none.
Save Saves the type data configuration to the file system.
Cycletime countercheck params [ms] Specifies the time intervals in [ms] at which the type data are to be counterchecked.
Add to statemenue The status of the type data is displayed in the Viper.NET status menu.
Auto resend params on not equal [ms]. If the actual values deviate from the setpoint values after reading the parameters, they are written to the controller again.
Add Inserts a new type parameter list (New tab). Data can be categorized for clarity.

Remove Removes the selected type parameter list.
Left Moves the selected type parameter list (register) to the left
Right Moves the selected type parameter list (register) to the right
Edit Name Changes the name of the type parameter list
Copy from Here all type data parameters of a type data manager can be copied for this type data manager. An offset for the GInOut data IDs of the type data must be specified.
Add Add a parameter.
Remove Remove a parameter.
Selected Row up Moves the selected parameter upwards
Selected Row down Moves the selected parameter downwards
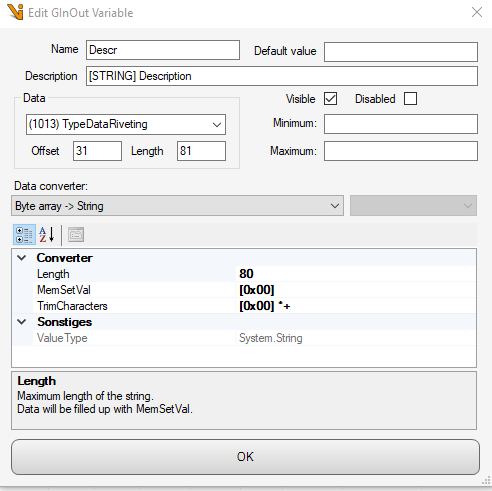
Edit GInOutVariable Edit the selected parameter using ‘Edit GInOut Variable’ form (see GInOut )
Hint
The type data can be subdivided into type parameter lists (registers), which serves the clarity. If a type parameter list is changed and is no longer consistent with existing data records, the user is given the option of manually clearing the conflicts via a special dialog.
Configuration: Unassigned parameters
In the event that parameter lists are renamed, added, removed or parameters are renamed, added or removed for a type, the parameters/values must be re-referenced to the data area. Changes to the configuration are permanently stored in ‘gioTypeDataManager_MyStation1.xml’ (GIO). Each MyType.xml references to the ‘gioTypeDataManager’ via the variable name. Consequently, a manual assignment is required for each type change.
Example: Type A and type B exist. Parameter list is renamed. From Params to Params1.
Form - ‘Not Assigned type data parameter lists’ appears. The user has the option of assigning or deleting existing type parameters.
For type A: Parameter list Params is renamed to Params1.
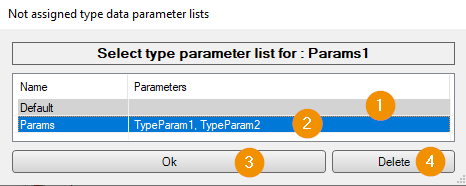
Dafault Selection of the default assignment.
Explicit selection of the listed parameters for transfer.
Ok Acceptance of the selection. In case, an element was added.
Delete Delete the selection. In case an element has been removed.
Switch to type B:
With the change to an existing type, the assignment must be made. See: Form - ‘Not Assigned type data parameter lists’
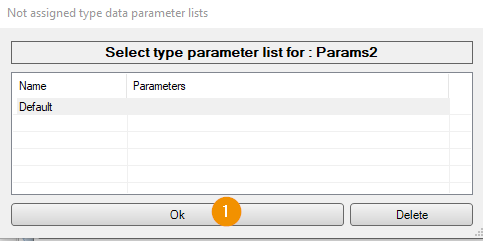
Ok Causes the new parameter to be adopted in the selected type.
Delete Would not take the values in the changed type.
Ex: For type A, parameters are renamed:
Not assigned parameters click.
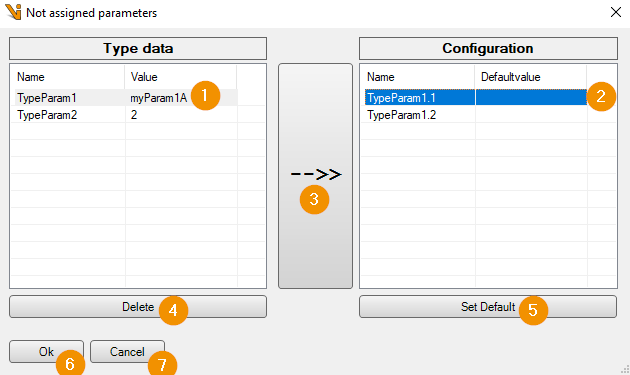
Selection of the old parameter.
Selection of new/renamed parameter.
Assignment of the two parameters (1) (2). After successful assignment, these are removed from the list.
Delete Delete an old parameter value.
Set default Sets the default value of the GInOut variable.
Ok Apply changes.
Cancel Discard changes.
Switch to type B:
With the change to an existing type, the assignment must be repeated.
Hint
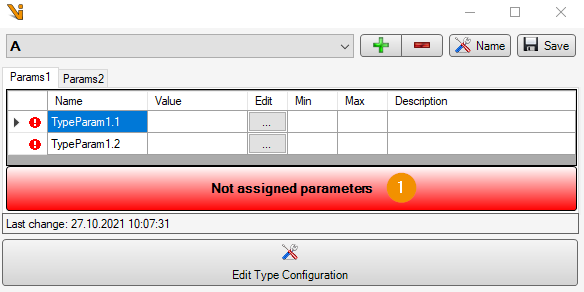
Correcting errors. If errors have been made in the configuration, these are displayed in an additional table. The user can clean up the configuration with the hints.
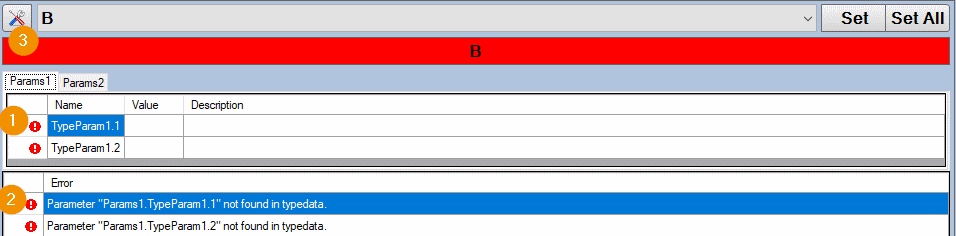
Exclamation marks indicate that the configuration of these types needs to be updated.
The error table provides information on how to rectify the problem.
The parameters can be assigned as usual via the configuration.
Type data activation in the Viper.NET project
userTabs.xml
<userTabs>
   <tab name="PLC-Params" type="ControlLayoutExtApps">
      <param name="operation" value="MainForm.Tabs.PLCParams"/>
      <param name="sortId" value="15" />
      <param name="width" value="1" />
      <param name="height" value="2" />
      <param name="extAppLayoutChildXml" value="Configuration\\extAppLayoutChilds.xml" />
   </tab>
</userTabs>
extAppLayoutChilds.xml
<extAppLayoutChilds rolesOrder="Admin,Service,Operator,Technican">
   <child type="CtlGioTypeDataManager" >
     <childLayout placeHolderId="-1" ptX="0" ptY="0" width="1" height="1" visible="True" user="" role="service|admin|operator|technican"/>
     <caption visible="True" height="24" text="PLC Data MyStation" backColor="" foreColor="" border="True" />
     <param name="backColor" value="LightSteelBlue"/>
     <param name="borderStyle" value="FixedSingle"/>
     <param name="gioTypeDataManagerName" value="MyStation"/>
   </child>
</extAppLayoutChilds>
.makproj
Single mode option:
In single mode, exactly one type data manager is used.
<dataStore>
<param name="gioTypeDataManagersXml" value=""/>
<param name="gioTypeDataManagerXml" value="gioTypeDataManager_MyStation1.xml" />
Multi-mode option:
In multi mode, several type data managers can be configured for different stations. Each type data manager must be given a unique name.
<dataStore>
<param name="gioTypeDataManagersXml" value="gioTypeDataManagers.xml" />
<param name="gioTypeDataManagerXml" value="" />
.\Data\gioTypeDataManagers.xml
<?xml version="1.0" encoding="utf-8"?>
<gioTypeDataManagers>
    <gioTypeDataManager name="MyTypDataStation1" file="gioTypeDataManager_MyStation1.xml"/>
    <gioTypeDataManager name="MyTypDataStation2" file="gioTypeDataManager_MyStation2.xml"/>
</gioTypeDataManagers>
Hint
If masterinstance=”true” is set for a type data manager, it will be used for every command if no type data manager name is specified.
gioTypeDataManager_MyStation1.xml
In this file all parameters from the form ‘Edit Type Configuration’ are stored. In addition, further attributes that cannot be configured via the form can be set.
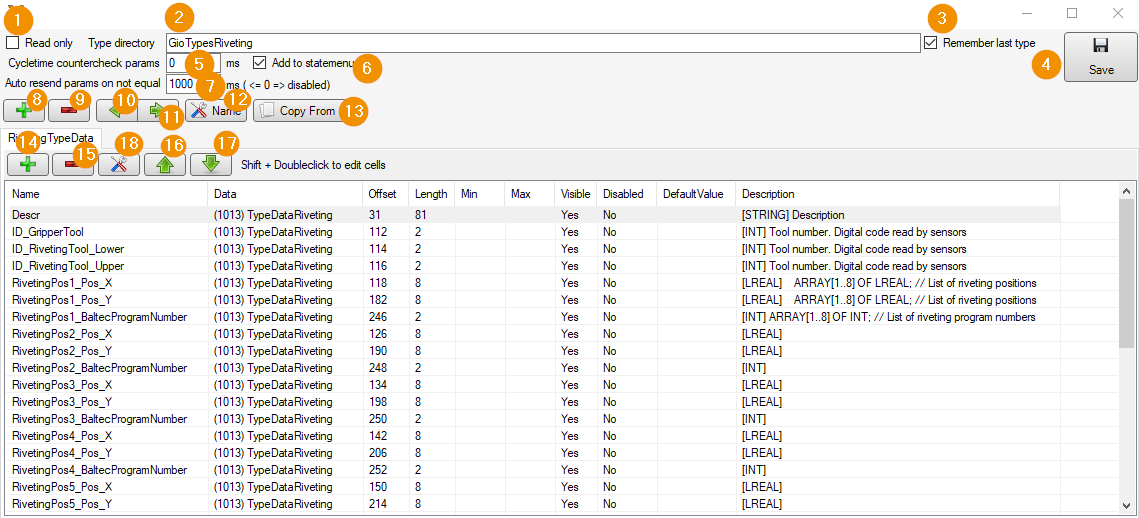
<gioTypeDataManager typeDirectory="GioTypesRiveting" archiveDirectory="Archive" zeroDataValue="*">
typeDirectory Folder of the type data MyStation.
archiveDirectory Archive folder in typeDirectory. Backup copies of MyType.xml are copied into this folder and provided with the current timestamp.
Type directory
This folder contains:
an archiveDirectory
the different MyType.xml of a station. For each type there is one MyType.xml, as well as the associated
xmlHistory.txt logs the parameter changes made by the Viper.NET user.
MyType.xml
A register created corresponds to a ParameterList. Here is the variable name-value assignment.
<typeData lastChange="24.05.2021 17:20:09">
    <parameterList name="MyParam">
        <param name="Descr" value="Description Typ MyType" />
        <param name="Param1" value="1" />
    </parameterList>
    <parameterList name="MyParamInNewTab">
        <param name="Descr" value="Description Typ MyType ComponentX" />
        <param name="Param2" value="2" />
    </parameterList>
</typeData>
MyType.xmlhistory.txt
Contains the log of user changes.
archiveDirectory
The type is archived by copying it into the archive folder and file name extension with time stamp ‘MyType~yyyy-MM-dd.hh-mm-ss.xml’. Archived type data is restored manually in the file system.
Hardware Explorer
For the interface to the PLC, three data blocks are used in the HW-Explorer.
Data block ‘TypeData’ -read/writeable
IN_Commandoblock ‘InCmd’ -readable
OUT_Commandoblock ‘OutCmd’ -writeable
The bits for the handshake with the PLC are also defined in the command blocks.
Viper.xio
<datas callHandleChangedSync="False">
   <data id="5" name="TypData_CmdIn" hwId="1" datablockId="1" offs="0" len="128" alignment="1" dir="in" neverPoll="False" counterCheckOutData="False" writeSetDataCyleTime="-1" dataChangedLogger="">
   </data>
   <data id="6" name="TypData_CmdOut" hwId="1" datablockId="1" offs="128" len="128" alignment="1" dir="out" neverPoll="False" counterCheckOutData="False" writeSetDataCyleTime="-1" dataChangedLogger="">
   </data>
   <data id="7" name="TypData" hwId="1" datablockId="1" offs="256" len="256" alignment="1" dir="inOut" neverPoll="False" counterCheckOutData="False" writeSetDataCyleTime="-1" dataChangedLogger="">
   </data>
</datas>
<inputBits>
   <bit id="9010001" name="TRIG_9010" dataId="5" byteIdx="0" bitIdx="0" invert="False" lowCol="grey" hiCol="green" />
</inputBits>
<outputBits>
   <bit id="9010001" name="READY_9010" dataId="6" byteIdx="0" bitIdx="0" />
   <bit id="9010002" name="BUSY_9010" dataId="6" byteIdx="0" bitIdx="1"  />
   <bit id="9010003" name="ERROR_9010" dataId="6" byteIdx="0" bitIdx="2" />
   <bit id="9010004" name="IO_9010" dataId="6" byteIdx="0" bitIdx="3"    />
   <bit id="9010005" name="NIO_9010" dataId="6" byteIdx="0" bitIdx="4"   />
</outputBits>
<varLists>
   <varList name="Vars_TypeData">
      <var typeId="GInOutVariable" name="InMyTypeDataCmd" description="Command from PLC" dataId="5">
         <in>
            <converter type="Gefasoft.MAK.Converter.ByteArrayToInt16Converter,Gefasoft.MAK" />
         </in>
      </var>
      <var typeId="GInOutVariable" name="OutMyTypeDataCmd" description="Command echot to PLC" dataId="6">
         <in>
            <converter type="Gefasoft.MAK.Converter.ByteArrayToInt16Converter,Gefasoft.MAK"/>
         </in>
      </var>
      <var typeId="GInOutVariable" name="InMyTypeDataTypeName" dataId="5" dataLength="31">
         <in>
            <converter type="Gefasoft.MAK.Converter.ByteArrayToStringConverter,Gefasoft.MAK" />
         </in>
      </var>
      <var typeId="GInOutVariable" name="OutMyTypeDataTypeName" description="PLC Response in order to confirm typechange" dataId="6" dataLength="31">
         <in>
            <converter type="Gefasoft.MAK.Converter.ByteArrayToStringConverter,Gefasoft.MAK"/>
         </in>
      </var>
      <var typeId="GInOutVariable" name="OutMyTypeDataStateinfo" dataId="6" dataLength="81">
         <in>
            <converter type="Gefasoft.MAK.Converter.ByteArrayToStringConverter,Gefasoft.MAK" />
         </in>
      </var>
   </varList>
</varLists>
station.xml configuration
<stationConfig>
    <station id="9010" name="TypeData_MyType" type="GioTypeDataStation">
        <param name="setBusyWithData" value="false" />
        <param name="managerName" value="Riveting"/>
        <param name="loadOnTypeChange" value="false"/>
        <handshake>
        <param name="wait4NegEdgeTrigger" value="true" />
        <param name="wait4NegEdgeTriggerTO" value="-1" />
        <param name="bitToASCII" value="false" />
        <in>
            <bit bitRef="9010001" id="trigger" />
        </in>
        <out>
            <bit bitRef="9010001" id="ready" />
            <bit bitRef="9010002" id="busy" />
            <bit bitRef="9010003" id="error" />
            <bit bitRef="9010004" id="io" />
            <bit bitRef="9010005" id="nio" />
        </out>
        </handshake>
        <commandInterface>
        <param name="wait4NegEdgeTrigger" value="True" />
        <param name="wait4NegEdgeTriggerTO" value="1000" />
        <in>
            <data varRef="Vars_TypeData.IN_MyType_Cmd" id="cmd" />
            <data varRef="Vars_TypeData.IN_MyType_TypeName" id="typeName" />
            <data dataRef="1011" offset="0" length="128" id="DATA" />
        </in>
        <out>
            <data varRef="Vars_TypeData.OUT_MyType_Cmd" id="cmd" />
            <data varRef="Vars_TypeData.OUT_MyType_TypeName" id="typeName" />
            <data varRef="Vars_TypeData.OUT_MyType_StateInfo" id="errorText" />
        </out>
        </commandInterface>
    </station>