QualityAssurance Plugin
The plugin provides support for performing measurement system analyses (MSA): A wizard guides through the process of data recording. Finally, the relevant data is exported to an evaluation. In addition to the measurement results, the data export also includes configuration data, including in particular limits for the respective measurement values.
If the input data of a measurement system analysis is stored and archived, the evaluation data-based-replay can be repeated, for example to validate changes to the project.
A measurement system analysis is started via the function menu. Which measurement results are relevant for the analysis is defined in the Job Editor. The setting of meta data such as limit specifications is also done there, if these are not possible in the toolgroup itself.
The following result values of a ToolGroup can be included in the analysis:
Results in CogDataAnalysisTools
Input terminals of ValueBlocks
Tools that implement the
Gefasoft.MAK.VisionPro.IResultValuesToolinterface, including:
Start of an MSA
Starting a measurement system analysis is done via the Function menu -> Start MSA. The wizard shows the selection of the desired MSA procedure as the first step:
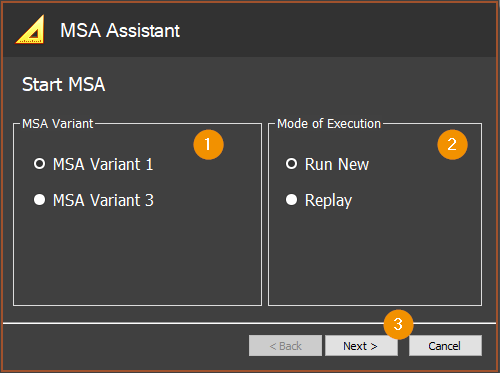
In the group MSA Variant one variant must be selected. Available are:
MSA Variant 1: Repeated measurement of a single component
MSA Variant 3: Repeated measurements of several different components
In the group Mode of Execution the mode of execution has to be selected:
Run New starts a new Data recording For this purpose, the parameters of the MSA are set in the next step of the wizard. The wizard guides through the data recording and ensures that a sufficient number of measurement repetitions are performed with the necessary configurations.
Replay starts the data-based replay of an evaluation. By means of RunFromDir stored input data of a previous MSA data recording shall be replayed. The mode is used, for example, to validate changes to a ToolGroup.
The navigation buttons of the wizard control the guided MSA process:
Next confirms the entries and takes you to the next step.
Back navigates back to the last step. The wizard warns of a possible data loss if necessary
Cancel cancels the analysis and closes the wizard.
Depending on the selected method, the MSA is parameterized in the next wizard step:
MSA procedure 1
In procedure 1, a series of repeated measurements of a single test specimen is examined.
Before starting a new datarecording, the desired number of repetitions (1) must be specified.
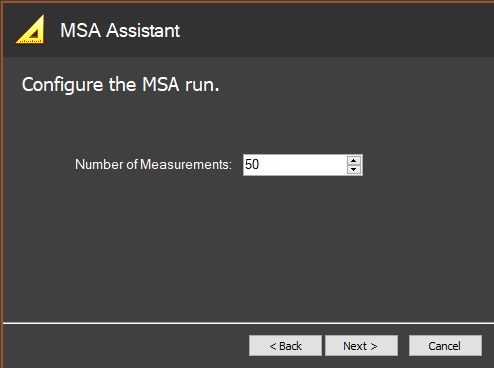
A click on Next leads to the data recording.
MSA procedure 3
For the analysis according to method 3, several components are measured repeatedly. The processing of the components should take place in a random order, but the test specimens must be identifiable for the evaluation. For this purpose, the wizard supports two modes when recording new data.
The wizard shows the following interface to set the parameters before starting a new data acquisition:

Number of Parts: Number of different parts to be measured.
Repeated Measurements per Part: Wie oft jedes Bauteil vermessen werden soll.
Part Processing Order: A mode for identifying parts and their processing order. The following options are available for selection:
Random Schedule: The wizard sets a random processing order. The user is given which part to process next during data recording.
Read from ToolGroup: The identification of the parts is done in the toolgroup. The ID must be communicated to the plugin via a MsaMetadataToolBlock. The order of the components is now freely chosen by the user. The wizard only checks the number of measurement repetitions per component and discards excess repetitions.
Change IDs: The button is only relevant if Random Schedule is selected to specify the part sequence. The parts are then named by the wizard with numbered identifiers, for example as Part 1. For easier identification, users can adjust these designators in advance by clicking the button:
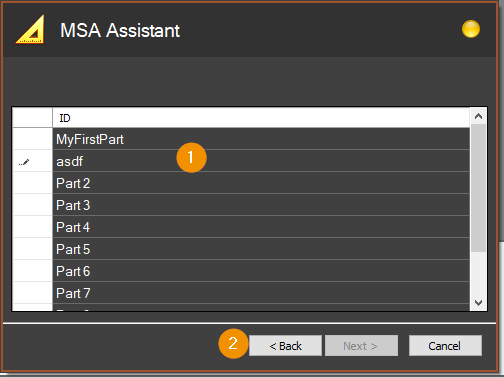
ID list: Identifiers are matched in the list. The identifiers must be unique within the list and must not be empty.
Back: Accepts the displayed identifiers and returns to the previous configuration page.
Data recording - New MSA
The data acquisition of a new MSA should preferably take place at a plant in delivery condition: the MSA wizard picks up data directly from the production process. During the MSA, additional entries are written to the input data, which allow easy replay evaluation.
It is also possible to perform the MSA with stored data, for example using image-sources-simulation.
Hint
If the new MSA is triggered by RunFromDir, it is important to remember that the input images and data are not saved. A Rerun of the MSA using saved data is then not possible.
Hint
For easy archiving of MSA data, it is recommended to empty the target directory of input data before starting the MSA.
The execution of a new MSA starts with opening the MSA wizard via the function-menu. In the procedure selection, the Mode of Execution option Run New must be selected to start a new evaluation.
In the next step, the MSA wizard queries the parameters of the selected MSA variant. This is followed by the dialog for data acquisition:
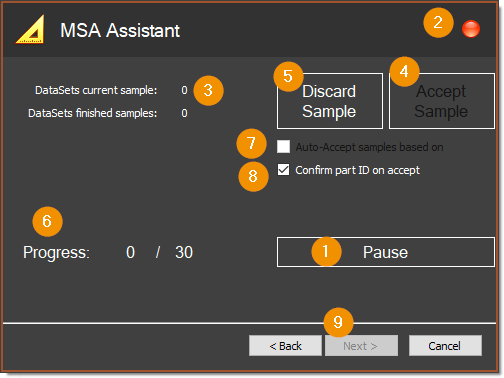
Clicking the Start button (1) starts the data recording. It can also be paused again and continued later. The button label and the status indicator (2) show the status of the data recording: during an active data recording the indicator flashes red.
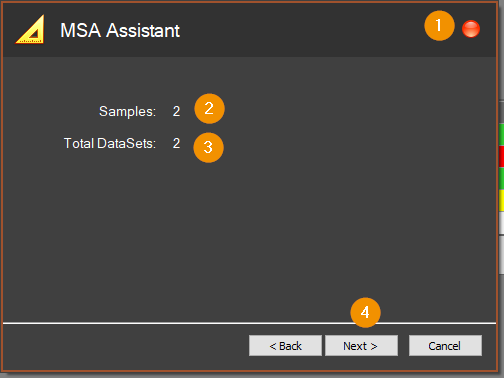
The data recording is divided into samples: A sample covers the machining of one component. This can include data from multiple ToolGroup-Item executions, including from ToolGroups from different Jobs. Each ToolGroup execution generates a record, which is associated with the current sample when data recording is active. The number of records recorded for the current sample is displayed as DataSets current sample (3).
The number of records per sample is primarily dependent on the project structure and the type of triggering during the MSA. Within an MSA, however, all samples must have the same structure: The number of data sets and their generating ToolGroups must be identical in all samples. Therefore, during data acquisition, the first sample of an MSA must always be completed by the user by clicking the Accept sample button (4). If the data of the current sample is invalid, for example due to a faulty operation of the system, it can be discarded by clicking on Discard sample (5). To complete the MSA, the respective sample must be repeated.
The number of samples completed and the total number of samples required in the current analysis are shown as progress (6).
The sample completion can be triggered by the plugin itself from the second sample onwards: whenever a sufficient number of datasets has been recorded. For this purpose, the checkbox Auto-accept samples based on Datasets (7) must be activated after the first sample has been completed.
In order to check the correct sampling process for specified runs with several components, the component ID is queried for confirmation as standard when the sample is completed. Only if the entry is correct, the current sampling data is transferred to the MSA run. The query is suppressed if the Confirm part ID on accept (8) checkbox is deactivated.
As soon as the necessary samples have been taken, the data recording is completed. The status indicator (2) will change to green. When clicking Next, the wizard will guide you through the Data export
Hint
To later replay the MSA based on the data the input data should be archived after each MSA.
Repetition of an evaluation
An MSA evaluation can be repeated using stored input data. For example, changes to a ToolGroup can be validated without having to re-record data.
Hint
A repeated MSA is only possible with input data saved during a data-recording with the MSA wizard.
A data-based replay is started by selecting Replay as the Mode of Execution in the Procedure selection. In the data ingestion step, the wizard displays the following interface:
If toolgroups with input data data from a previous MSA are replayed in this state via RunFromDir, the toolgroup results are included in the MSA.
Status indicator: red flashing indicates that data is being collected from toolgroup executions.
Samples: shows the number of samples taken. Input images are assigned to samples based on the stored input data from the data-recording.
DataSets: shows the number of stored data sets. One data set corresponds to one toolgroup execution.
Next: Completion of data recording and transition to export.
In repeat mode, no specifications are checked for the order and number of samples: The user is responsible for processing all recorded MSA data in RunFromDir. Incomplete processing may result in incomplete or incorrect data tables being generated in the export.
Hint
Recorded MSA data can be processed in any order. When processing an image multiple times, the data of the last execution is saved.
Data export
After the data acquisition is completed, the destination for the export must be selected:

Exporter List: Depending on the selected procedure several exporters are available. The exporters generate different output files, for example with different data representations, evaluations or file formats.
File: File path of the target file for export. The Browse button on the right opens a dialog for path selection.
Next: performs the export to the selected target. Exports only toolgroup results that are selected as active in the job-settings.
Hint
Changes to the job-settings, such as selecting relevant readings, will still take effect in this step: the current export can still be adjusted here.
After complete completion, the wizard displays the success:
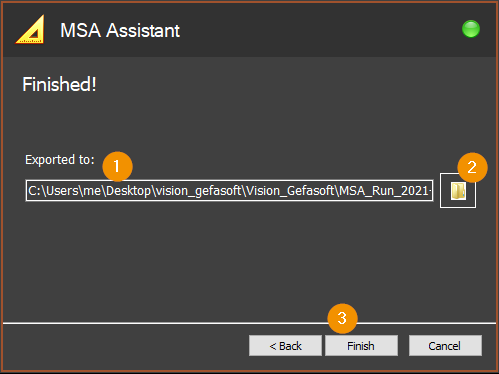
The path of the exported file is displayed again under Exported to (1). A click on the Browse button (2) opens a new Explorer window in the target directory. Finish (3) closes the wizard.
Hint
After completing an export, another export of the same MSA run can be performed by returning to the export step via Back button. It is therefore advisable to first check the result file before completing the wizard:
Shell Extensions
Function menu
The QualityAssurance plugin adds the Start MSA item to the functions-menu. Clicking launches the MSA Wizard, which will guide through a new MSA with data recording or enable replay of saved MSA data.

Job settings - MSA
The QualityAssurance plugin adds a MSA tab to the Extensions tab of the job-editor.
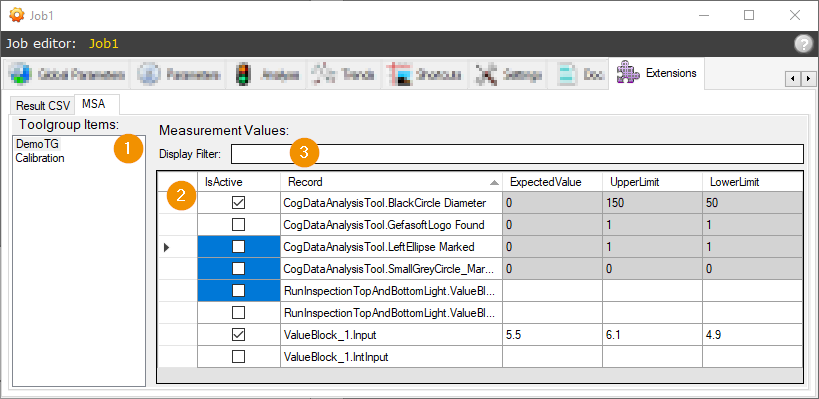
The settings are made separately for each ToolGroup-Item. This must therefore first be selected on the left in the ToolGroup Items list (1).
The Result entry list (2) lists the available measurement value entries of the selected toolgroup item and allows editing of the entries. A single measurement value entry can have multiple result values for different items in an analysis: for example, the PinCheck3DTool lists entries at the pin type level. Each pin belonging to the pin type is then evaluated as an item with its own measurement value for the active measurement value entry.
Active: determines whether the measured value is evaluated in the analysis. Only active entries are written to the target file during data export.
Record: unique identifier of the result entry: the identifier is composed of the complete tool path within the ToolGroup and a name that is unique within the tool and describes the result.
Expected Value: Expected nominal or reference measured value.
Upper Limit: Upper tolerance limit of the measured value.
Lower Limit: Lower tolerance limit of the measured value.
Warning
Sofern Einstellungen, wie etwa die Toleranzgrenzen, innerhalb eines Tools möglich sind, werden die Einstellungen in der Liste zwar zentral angezeigt, können hier aber nicht verändert werden. Sie erscheinen grau hinterlegt.
To facilitate editing of the list in larger toolgroups, the display can be filtered by entering a Display Filter (3): Only entries whose record matches the filter expression are then displayed. In the filter expressions, asterisks * can be used as placeholders: they represent any number of arbitrary characters.
Hint
Several cells can be edited at the same time: to do this, the cells are selected and the editing is carried out in the last one. The value is then automatically transferred to the other cells. To edit multiple selected Chekboxes,the value of the last selected one must be toggled by pressing the spacebar.Afterwards the cell must be exited. This is, because the selection is lost whenthe value is toggled with a mouse click.
MsaMetadataToolBlock
If the QualityAssurance plugin is active, data from the tool group can be transmitted to the plugin during a running MSA. The ToolGroup may contain exactly one CogToolBlock named MsaMetadata:
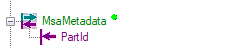
Data is passed to the plugin via the input terminals. Supported:
PartId [string]: The terminal transfers part identifiers, for example from a data matrix code, to the plug-in. This ID is only evaluated in the context of a MSA variant 3, if Read from ToolGroup was selected as Part Processing order. In this case the value is mandatory!