Job Editor
ToolGroup Items
The ToolGroup Items of the job are managed in the first tab of the Job Editor.
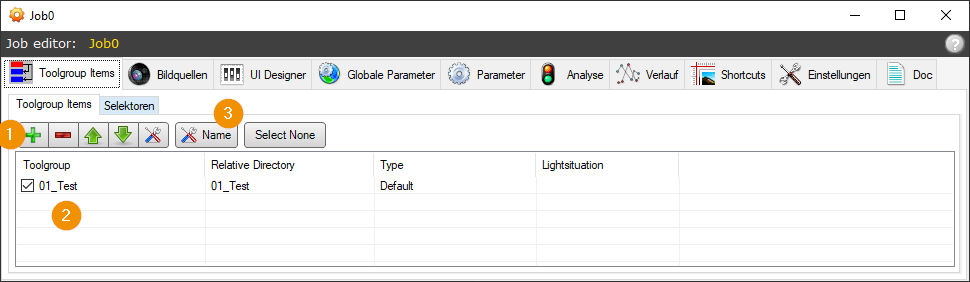
All ToolGroup items of the job are displayed in this list. The check mark selects the active ToolGroup item, which is used, for example, when executing the BV via the Job Display.
With (1) ToolGroup items can be created or deleted and the order can be changed. In addition, the ToolGroup Item Editor can be opened (alternatively by double-clicking in the list). The ToolGroup Item is renamed via (3).
When creating a new ToolGroup item, the following information is required:
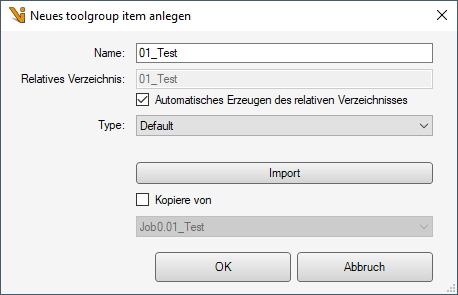
The name must be unique within a job. It can be prefixed with a ID.
With Relative Directory is defined where the files of the Toolgroup Item are stored relative to the job. A change is only necessary for special configurations.
The type can only be set at creation time and cannot be changed later.
ToolGroup items can be copied when created, either from another currently loaded type, or via Import through the file system from any other project. When importing, the ToolGroup item to be copied is loaded and inserted into the Copy From list:
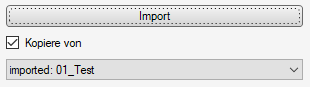
When importing, .tgitem or .vpp files can be used. With .tgitem, all settings are loaded, including the image sources or IO assignments, while with .vpp only the Cognex ToolGroup is imported.
Hint
ToolGroup items that cannot be loaded cannot be imported.
ToolGroup Item Selectors
Selectors are defined here that can be used as an alternative to the ID for selecting the ToolGroupItem to execute. Instead of a simple ID, the VPP selector selects the ToolGroupItem to be executed based on the value of GInOut variables.
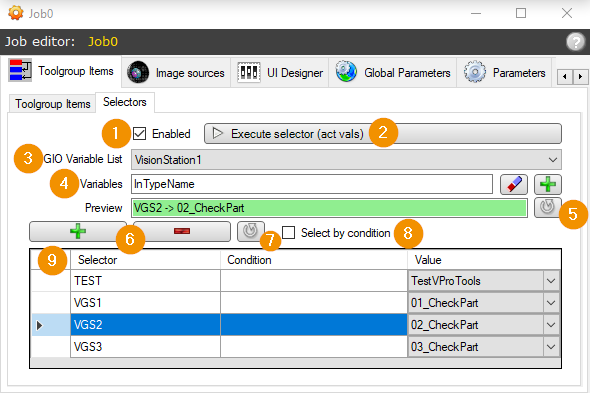
Enabled: Enable or disable VPP selector.
Execute selector: Select ToolGroupItem based on the current values of the GInOutVariables.
GIO Variable List: Name of the variable list containing the hardware variables.
variables: Comma-separated list of variable names. The buttons can be used to add variables by list selection or to remove invalid variables. Invalid variables are variables that are not contained in the set variable list.
Preview: On button click, shows the selector and name of the ToolGroupItem that would be selected based on the current values of the GInOutVariables. In the picture the value of the variable ‘InTypeName’=’VGS2’. Therefore the selector with the name ‘VGS2’ is also effective and the ToolGroupItem ‘02_CheckPart’ is selected. If no matching selector is found, the field red appears with an error message.
+ -: Add/remove an entry in the List of VPP selectors (9).
Refresh: Update list of VPP selectors.
Select by condition: Specifies whether the decision to select a selector is based on a logical condition:
Off: The ToolGroupItem is selected based on the selector names. The text values of the individual variables are seamlessly appended to each other. If the text value of the variable corresponds to the name of the selector, the corresponding ToolGroupItem is selected.
On: The ToolGroupItem is selected based on the Condition of the selectors. The numeric values of the variables are inserted into the condition equation equation. The list of equations, or conditions, is processed from top to bottom. If the result of a condition is True (not equal to ‘0.0’), the corresponding ToolGroupItem is selected.
List of VPP Selectors:
Selector: Unique name of the selector.
Condition: Logical equation for the selection condition. It must be specified exactly if Select by condition is active. It may contain the names of the selected variables, decimal numbers, comparison operators, parentheses and logical operators.
Value: Name of the ToolGroupItem that is selected when the selector matches.
Example for Select by condition:
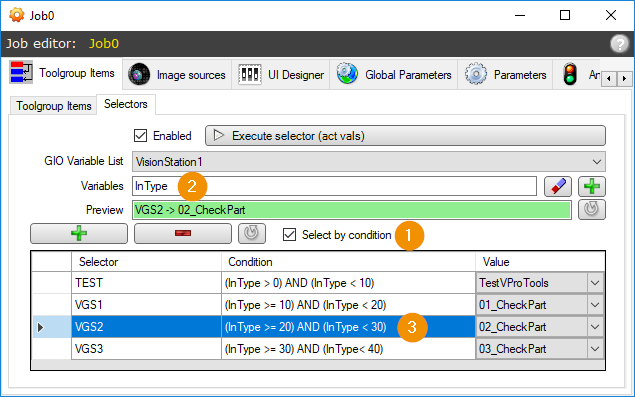
If Select by condition (1) is selected, the values of the variables (2) are inserted into the equations (3). If the result of the equation is not 0.0, the corresponding ToolGroupItem is selected. In the following example, the value of the variable ‘InType’=’27’:
TEST : (27 > 0 ) AND (27 < 10) : NO
VGS1 : (27 >= 10 ) AND (27 < 20) : NO
VGS2 : (27 >= 20 ) AND (27 < 30) : YES
VGS3 : (27 >= 30 ) AND (27 < 40) : NO
Since selector3 has the first condition met, it becomes active and the ToolgroupItem is set accordingly.
Hint
Multiple overlapping selector conditions should be avoided, but are allowed. For image source selection, the first matching selector in the list is used.
Image sources
Each job has its own Image Source Lists which can be edited here. The list can be used instead of individual lists in the ToolgroupItems or image sources can be defined as reference targets for Reference image sources.
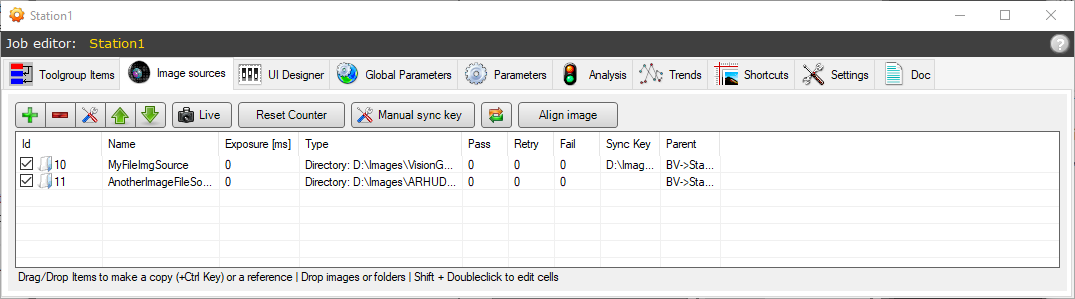
The interface shows the default editor for Image Source Lists.
UI designer
Here a custom interface can be configured for each toolgroup item via UI-Designer. The BV-settings show this interface to the currently selected toolgroup item.
Global parameters
Global parameters are used if default values of a BV type are required in several ToolGroup items. The default values then only have to be adjusted in one place. Before executing a BV job, the output terminals of GlobalVisionParams tool blocks are set to the values of the global parameters. The names of the terminals correspond to the names of the global parameters.
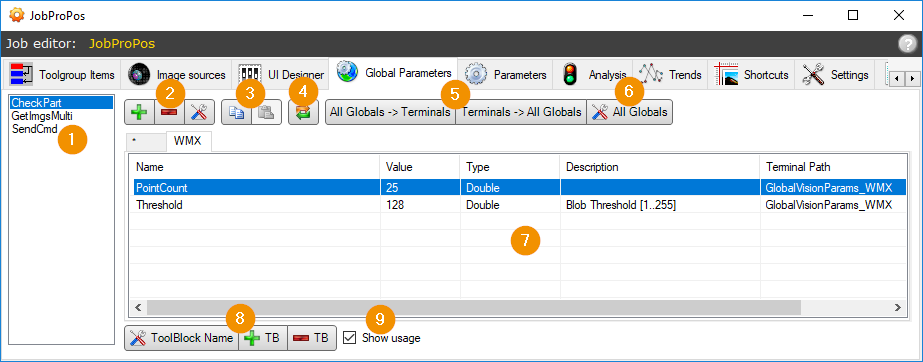
Global parameters in the job editor
After selecting the ToolGroup item (1), new global parameters are created, existing ones are linked or links are removed (2). When the first parameter is created, a GlobalVisionParams toolblock is automatically inserted at the beginning of the ToolGroup.
Then a new or existing parameter can be assigned to a terminal:
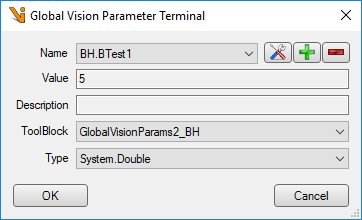
The name of the terminal corresponds to the name of the parameter. The terminal is created again if required.
With All Globals -> Terminals (5) all available global parameters can be created and linked at once. The Terminals -> All Globals button, on the other hand, is helpful if a ToolBlock is subsequently renamed to a GlobalVisionParams ToolBlock, since all compatible output terminals defined in the ToolBlock are then adopted as global parameters.
The button Globals (6) opens the dialog for setting all global parameters. This includes parameters that are not used in the selected ToolGroup item.
The global parameters can also be divided into categories. The parameters of each category are displayed in a separate tab (7). The associated GlobalVisionParams tool blocks are appended with the name of the category after an underscore (e.g. “GlobalVisionParams_WMX”). To create multiple GlobalVisionParams tool blocks of the same category on the same level, a suffix must be added to the name before the category (e.g. suffix=”2” category=”WMX” => “GlobalVisionParams2_WMX”).
With ‘Toolblock Name | +TB | -TB’ (8) renames, adds or removes a GlobalVisionParams toolblock. If ‘Show usage’ (9) is selected, the path to the toolblock terminal (“Terminal Path”) is also displayed in the parameter list.
Existing parameters can be copied from one category to another via ‘Copy/Paste’ (3) from one category to another.
Via the button ‘Refresh’ (4) all Global Parameter Toolblock terminals of the ToolGroup item are re-read and the List (7) is updated.
Note
Currently only parameters of type double, int, bool and string are supported.
BV parameters
Parameters in the Job Editor
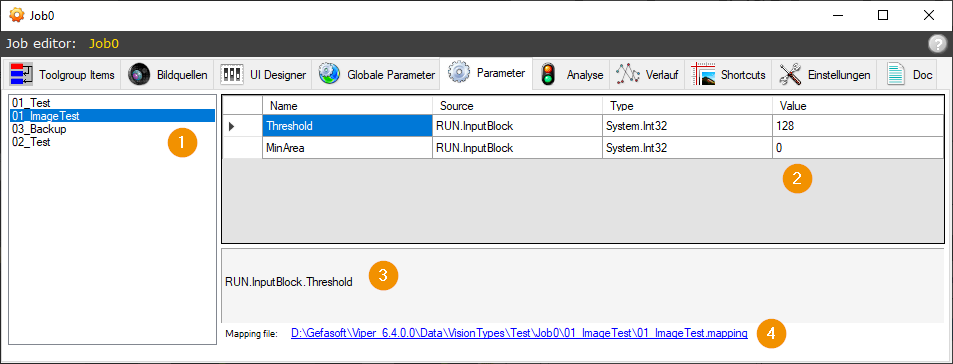
The BV Parameter list contains all output terminals of InputBlock-Toolblocks of the ToolGroup item (1) selected on the left. The parameter value can be changed in the Value column (2). The mapping editor (4) can be used to customize the display name in the Name column and the description in (3).
The BV parameters are also adjustable via the BV Settings (Operator view). They can also be used in the UI Designer.
Mappings
Mapping Editor
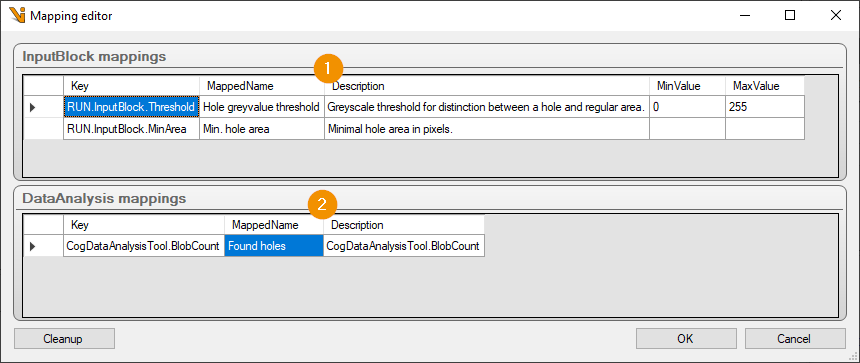
For BV parameters (1) and analysis values (2), the display name and description can be adjusted in the mapping editor. For numeric BV parameters, it is also possible to specify a min and max value.
Note
The Min and Max values are only used when entering via the BV parameters, but not when the value is changed directly in the ToolBlock.
Analysis (limit value test)
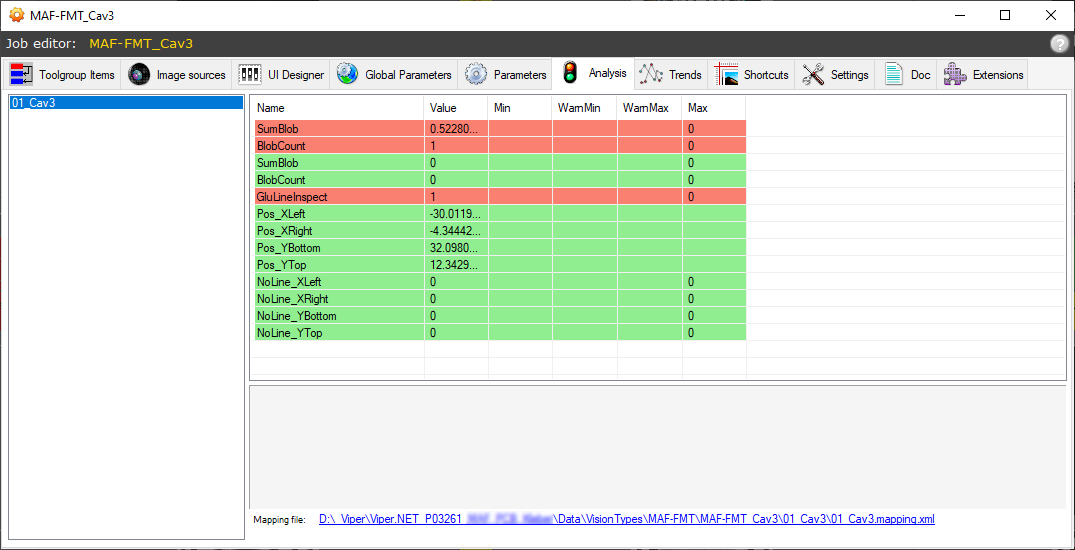
All checks in the job are summarized in the Analysis tab. Double-clicking on an entry opens a dialog in which the limits can be changed or deactivated.
Trends
A trend or history is used to store and graphically display the last values of a measured variable. This makes it easy to detect creeping or systematic changes to the measured values. All measured values from CogDataAnalysisTools as well as numerical values from ValueBlocks and TrendResult-Blocks can be used as trends.
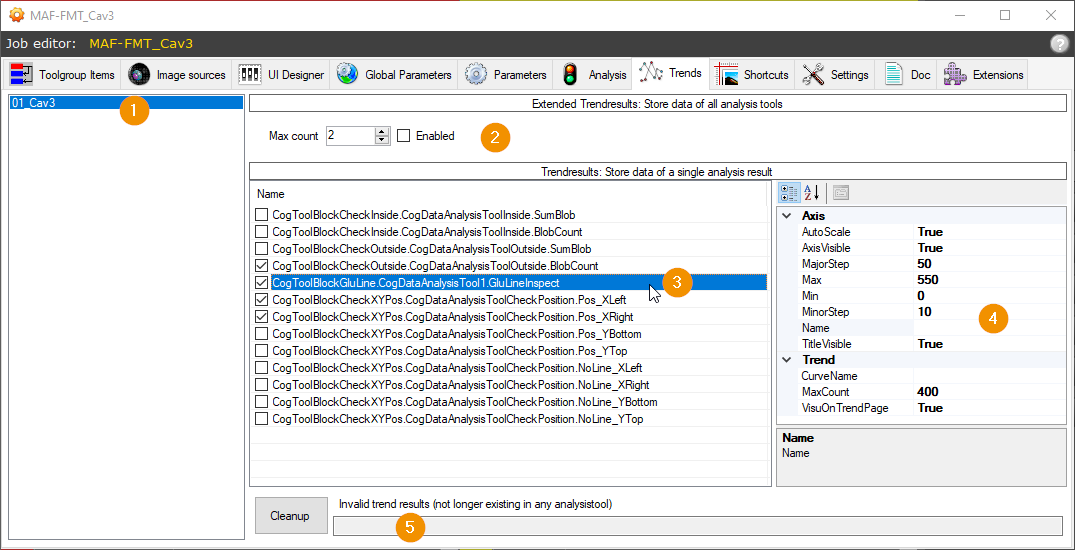
Trends are distinguished between TrendResults (3,4,5) and Extended TrendResults (2).
TrendResults
TrendResults are selected individually and the display and other parameters (4) are configured directly in the job editor:
Axis.AutoScale: Specifies whether the scaling of the Y-axis should be calculated automatically.
Axis.AxisVisible: Display of the coordinate axes on/off.
Axis.MajorStep/MinorStep: Step size of
minorandmajormarks on the coordinate axis. Ignored ifAutoScale=true.Axis.Min/Max: Min. and Max. Value of the Y-axis. Ignored if
AutoScale=true.Axis.Name: Optional axis label.
Axis.TitleVisible: Display the curve name in a legend.
Trend.CurveName: Name of the trend curve. If empty, the name of the measured variable is used.
Trend.MaxCount: Maximum number of stored measured values for the trend.
Trend.VisuOnTrendPage: If
true, this trend graph will be displayed on the Trend tab.
The TrendResults can be displayed in the Trend diagram (Fixed) and Trend diagram (Selective) subdisplays.
Extended TrendResults
Extended TrendResults are only activated and the number of measured values to be saved for the trend is specified. All available measured values are then saved.
The display of Extended TrendResults is done in Trend diagram extended, where also several measured values can be overlaid in one diagram. For 2D coordinates there is also Trend diagram extended 2D coordinates as an alternative.
Hint
Since the display of Extended TrendResults is not centrally configured, they cannot be displayed in the trend-tab.
Shortcuts
Settings
This tab contains various settings of the job.
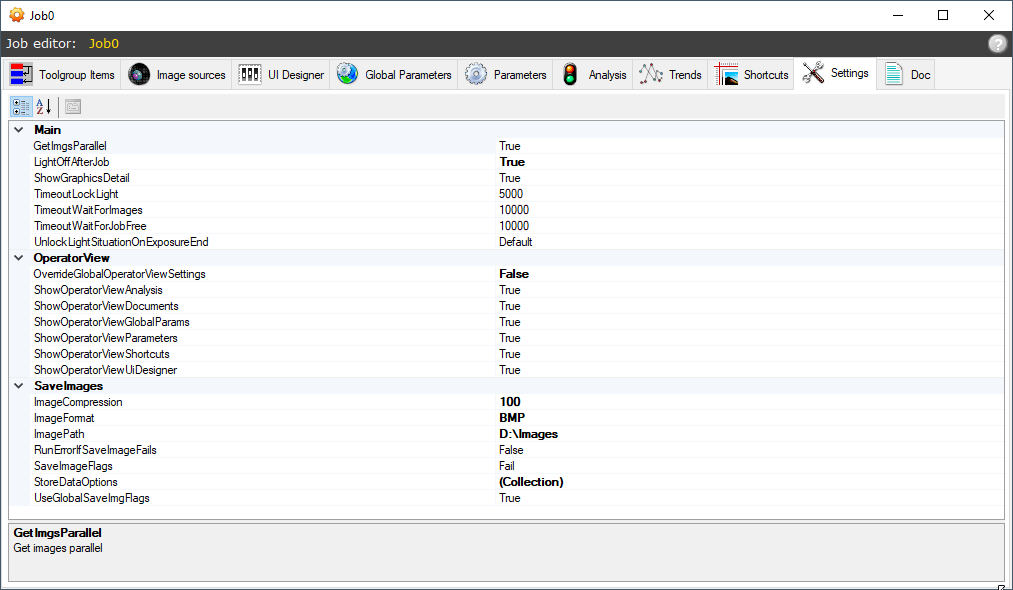
Main:
GetImgsParallel: Specifies whether parallel (
True) or sequential (False) imageacquisition should occur for multiple image sources.LightOffAfterJob: If
True, the last light situation after imageacquisition will be disabled again. Can be disabled to optimize runtime, but then the global settings should be used to ensure that the lighting is turned off when not used for a long time.TimeoutLockLight: Maximum waiting time for accessing the lighting channels during imageacquisition.
TimeoutWaitForImages: Maximum time within which the imageacquisition must be completed.
TimeoutWaitForJobFree: Maximum waiting time for the start of a execution, within which the job must be released. For example, if the job was started both via the interface and via an external trigger.
UnlockLightSituationOnExposureEnd: Specifies whether to unlock the light situation on image-acquisition as soon as the cameras ExposureEnd signal is received (
Yes), or only after the image has been successfully transferred (No). IfDefault, the value from the global-settings is used. Only works if LightOFfAfterJob is set toTrue.
OperatorView:
Optional: override global-settings for the operator view.
SaveImages:
RunErrorIfSaveImageFails: Specifies whether an error when saving the input images should result in an incorrect evaluation.
UseGlobalSaveImgFlags: The other parameters only take effect if
falseis entered here. - ImageCompression: Compression level when saving images, if a compressible image format was selected. - ImageFormat: Storage format for input images. - ImagePath: Base path for input images. - SaveImageFlags: Selection of ratings for which images should be saved. - StoreDataOptions: Configuration of save options for extension image sources, e.g. from the halcon plugin.
Documentation
The online documentation of the job and all ToolGroup items is displayed here. Under Edit the documentation of the job can be adjusted.
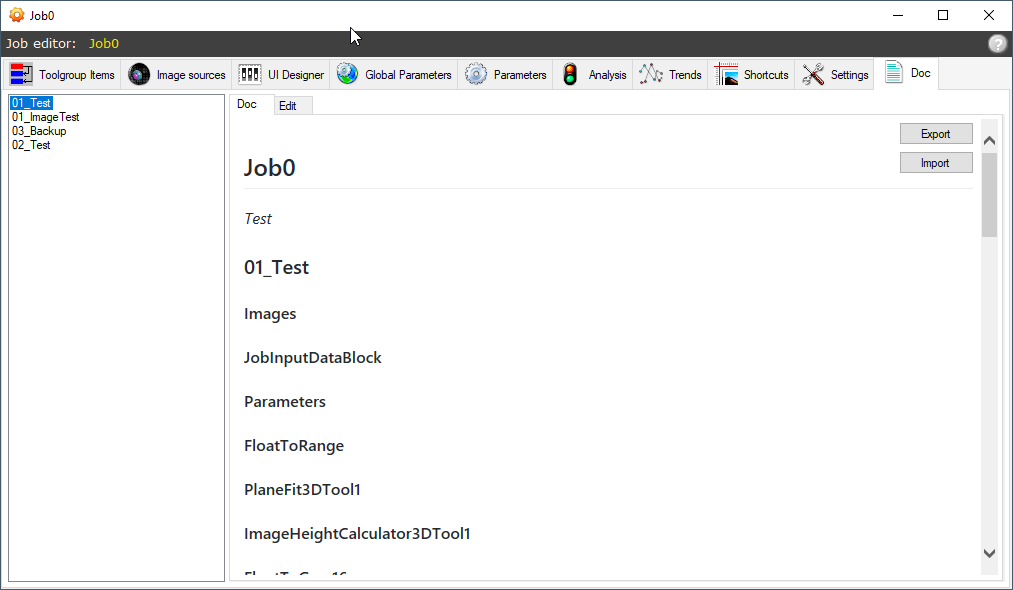
The structure of the documentation sections follows the structure of the job: The main heading with the job name is followed by a section with the Job Documentation. After this, the individual Toolgroup Item documentations are attached as subsections.
The job documentation is created in the Edit tab of the Job Editor. Text formatting is done using Markdown syntax. An overview of this can be found in the Edit->Markdown Cheatsheet tab.